So today I made 2 very simple soups that were easy to put together but still super yummy and satisfying. They aren't gourmet meals or anything, but I desire to focus on foods that are nourishing and nutrient dense - and sometimes that just means simple but always yummy!
First, though, I wanted to share my little process to making wonderful hard boiled eggs that aren't overdone! This method also allows for multi-tasking (aka me forgetting to take care of the eggs because I get caught up doing something else!). There is wiggle room in this that helps so very much! And really, I am so excited because I have been testing this process over several batches, and they have all come out wonderful! Cooked, yet still soft (not rubbery!), egg yolks cooked, but not overdone. And they're easy to peel. Yay. So here we go.
Perfect Hard Boiled Eggs {How-To}
(for the easily distracted cook and mom!)
Steps:
- Fill your pot with water enough to cover eggs by about 1 inch (guesstimate :-) ) and bring to a boil
- Add salt - I usually throw in about 1 tsp-1 Tbsp depending on the size of pot I am using. This helps with peeling!
- Add your eggs gently (I find a slotted spoon works really well).

- Cover and bring back to a boil. (this is the only part where you need to keep an eye on it at least every now and then).

- Once it comes back to a boil, take lid off and set timer for 5 minutes. All you have to do during this step is keep it at a gentle boil. (excuse the cooked egg floating in the water...apparently one of my eggs was cracked...don't worry, i removed it!)

- After the 5 minutes is up, remove from heat and put the lid back on. Set timer for 5 minutes again. See, you don't even have to remember another time length!
- After those 5 minutes are up, place eggs (grab that spoon again!) in a bowl of ice water. This stops the cooking process and allows you to not have to take care of it right away because you are so busy (or just get very easily distracted...).

- Peel when you have time and refrigerate for easy meal additions or snacks!


- Boil water, add salt, add eggs, bring to a boil, timer for 5 minutes, turn heat off and cover for 5 minutes, put in ice water, peel when you can!
- the 5 minutes boil/5 minutes sit was for some large eggs. I would take off 1 minute of each step for small eggs. Try to do eggs that are all around the same size if your eggs vary.
- When I cook mine, I set my timer for the boiling part for the exact time because all I have to do is turn the flame off and cover it. However, for the 5 minutes of sitting in hot water, I set my timer for 3 or 4 minutes because rarely am I ready to take the eggs out of the pot right away. I hate overcooked hard boiled eggs, especially when the egg yolks get gray and hard, so I set my timer a little early to allow myself some wiggle room with not being ready to put them in the ice water instantly!
Chicken "Noodle" Soup {Stage 1 and beyond}
Stage 1 adjustments: omit parsley, can just boil veggies instead of sauteing
Ingredients:
2 tbsp fat - chicken fat (from top of chilled broth), coconut oil, butter, or ghee
1-2 cups chopped or diced onions
1-2 cups chopped carrots
Parsley, fresh or dried
4-6 cups chicken broth (depending on how dense or liquidy you like your soups)
3-4 small-medium zucchini
2 cups chopped or shredded chicken
Salt and pepper, to taste
2-3 garlic cloves, crushed or minced
Instructions:
- Saute onions and carrots in your choice of fat until onions begin to turn translucent. Add Parsley (however much you want! I used about 1 Tbsp dried).

- Add broth, bring to a boil. Meanwhile, prepare zucchini into noodles - thick by slicing the zucchini into desired size of strips or nice and thin (more like actual noodles) with a julienne slicer! This time I did thick, but I think we prefer the thing ones with the julienne slicer.


- Once carrots are tender, add zucchini and simmer (covered or uncovered, whatever you prefer!) until zucchini are tender (time varies on size of zucchini 'noodles').

- Add chopped chicken and garlic, bring back to a boil and then turn heat off! Cover and let sit 5-10 minutes.
- Salt and pepper to taste!


Simple Chicken Enchilada Soup {Full GAPS or Stage 3}
Stage 3 adjustments: Omit cheese and use whatever dairy you are doing at this point - kefir, yogurt, or sour cream! It's still great without cheese! Can also simply boil veggies instead of sauteing.
Ingredients:
2-3 Tbsp fat (chicken fat, ghee, butter, coconut oil)
1 green bell pepper, chopped
1 1/2 - 2 cups onion, chopped (about 1 medium-large onion)
2 garlic cloves, crushed or minced
optional: small can of green chiles (I never use these because we aren't spice-handling peeps)
2 tsp ground coriander (or up to 1 Tbsp, depending on how much you love coriander)
6 cups chicken broth
2 cups chopped or shredded chicken
2-3 additional garlic cloves, crushed or minced
Salt and Pepper, to taste
At table:
1-2 cups sour cream, yogurt, or kefir (raw is best)
6 oz shredded raw cheddar or Monterrey jack cheese
Instructions:
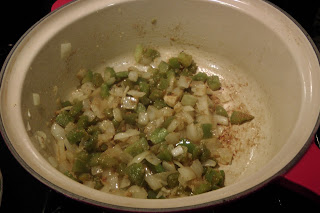
- Saute bell pepper, onion, (and optional chiles) and garlic in fat until onions are getting translucent. (The garlic in the tiny glass bowl is the cloves to save for later)

- Add coriander and some salt (I start with 1 tsp and then add salt at the end to taste) and stir. Ah, the smell!
- Add broth, bring to a boil, and simmer until veggies are desired 'doneness'. :-)
- Add chicken, bring back to a boil.
- Add remaining garlic, turn heat off, cover, and let sit 5-10 minutes.
- Salt and pepper to taste.
- Serve soup in bowls, and once the soup has cooled down to being just warm (so as to not kill all the good rawness bacteria and cultures in the cheese and sour cream/yogurt/kefir!!), add cheese and sour cream into bowls. The amounts in the recipe are for the entire pot, so keep that in mind lest you simply dump all of it into just a few bowls. :-) You could also add all of it to the pot, but you'd have to wait a mighty long time for the entire pot to cool down to being just warm! It may not be the most beautiful soup, but it's yummy and we love it!!


Chewy Chocolate Cookies {Full GAPS}
Ingredients:
3 egg whites
2 cups almond flour
1-2 tsp vanilla
6 Tbsp honey (or less - or more! - to taste)
6 Tbsp raw organic cocoa powder (non-dutched!)
pinch of salt
Instructions:
- Beat Egg whites with vanilla until frothy.

- Beat in honey, then stir in almond flour, cocoa powder, and salt.It's very dense and doughy. Keep your kids busy with anything.
 :-)
:-)

- Put on parchment paper lined cookie sheets (unless you have good baking sheets and don't need to use it!) in rounded teaspoons. Note: my cookies did not change shape at all. They don't fluff up or anything - I am going to play around with this recipe and hopefully get a better shape and texture. So how you put them on the cookie sheet will probably be how they turn out unless I am just not good at this. I like the taste, though!

- Bake at 350* for 10-12 minutes. I like them less done - dense and fudgy in the middle!!


I based it off this recipe for cinnamon nut cookies, which turned out the same when I made them. Maybe it's the almond flour I am using? They didn't look like her pictures, so maybe I'm doing something wrong. Oh well, they were still super super yummy to us!!!
Hope you enjoy something on here!!
Why not used dutched cocoa? Thanks for the recipes!
ReplyDeleteIt's processed with Alkali
DeleteOr if you like a milk chocolate flavor use 1/2 Cacao powder and 1/2 carob powder. The cookies won't change shape because there is no gluten from regular flour in them. So pre shape how you want them to look. :)
ReplyDeleteOr if you like a milk chocolate flavor use 1/2 Cacao powder and 1/2 carob powder. The cookies won't change shape because there is no gluten from regular flour in them. So pre shape how you want them to look. :)
ReplyDelete